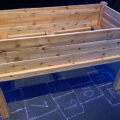
I spent the last few days finally putting some finishing touches on my office workbench, and that mostly involved fitting countertops together.
Yes, I finally got around to working on the countertop I talked about nearly two years ago when I asked about making clean corner seams. Between then and now, I simply had two slabs sitting on top of my bench, and it wasn’t ideal.
The seams… well, after a few tries I got a passable mating between the pieces that would fit into the corner. But, the quality of edge fitment aside – I’ll talk more about this another time – I needed a strong and secure way to join them together.
Usually, you can use biscuits, Festool Dominos, floating tenons, or other such means for alignment and strength if you desire to glue wood countertops together for a permanent joint. I might need to temporarily take things apart in the future, and so I didn’t want a solution that involved gluing things together.
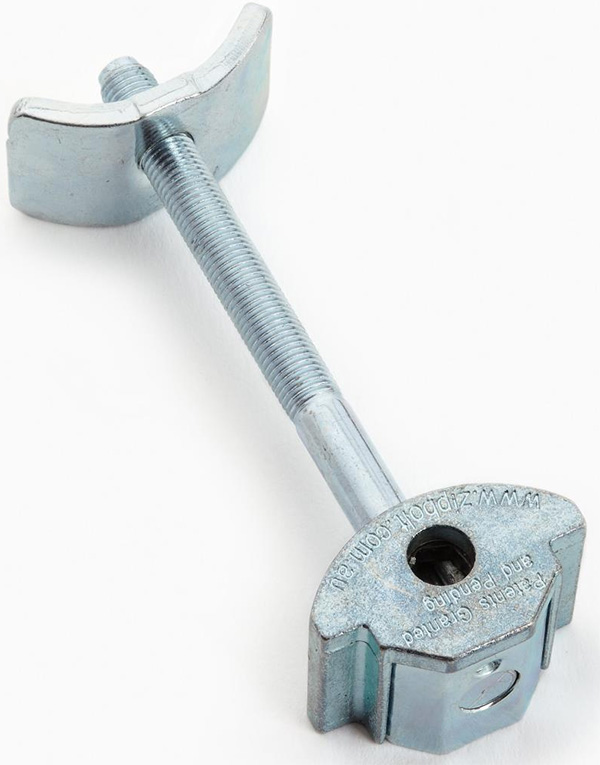
I’ve known about Zipbolts for a while, and they seemed perfect for the job. I could use them on their own, or as part of a glue-up to provide clamping strength.
I considered two sizes:
- 81mm connector: requires 35mm x 20mm deep hole (1-3/8″ x 13/16″)
- 100mm connector: requires 25mm x 12.5mm deep hole (1″ x 1/2″)
The 81mm connector is shorter length-wise, but is physically larger. Since I’m working with 1-1/8″ butcher block-style wood countertops, I opted for the larger and presumably stronger Zipbolt connector.
I couldn’t tell you how to pick one size over the other. I bought a couple of both, and ultimately decided that, for me, the 100mm Zipbolt would work better in materials maybe 3/4″ to 1″ deep, given the 1/2″ recess requirement, and the 81mm Zipbolt would work better in my 1-1/8″ countertop, given its ~13/16″ recess requirement. The 81mm Zipbolt connector is larger, with more contact surface area, and so I would assume it provides for a stronger connection.
Installation was refreshingly easy.
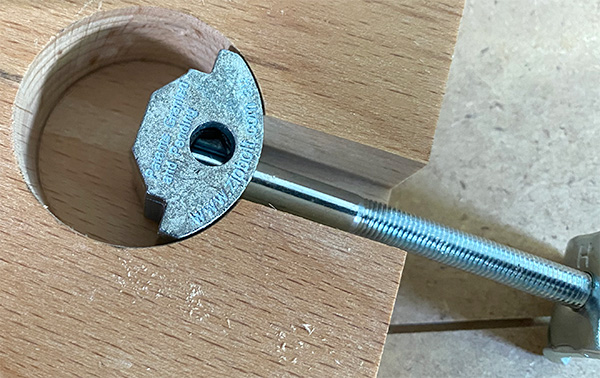
You need a Forstner drill bit for the holes, a square or ruler for proper positioning (I used Milwaukee’s trim square), a router with straight-cutting bit to cut the slot (although I’m sure other tools can be used), and a 5mm bit to tighten the ZipBolt.
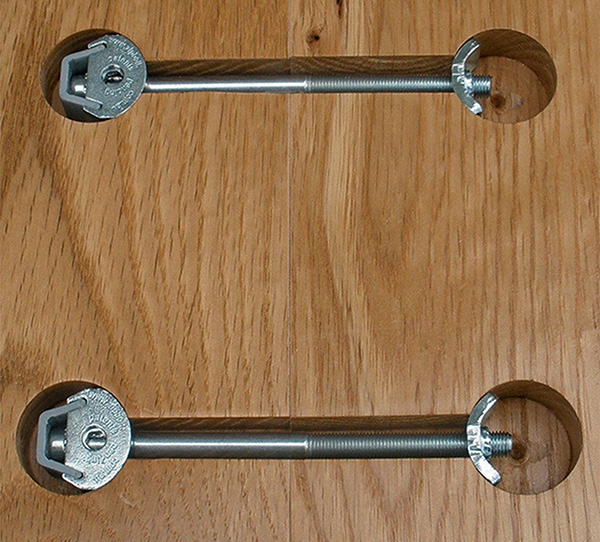
I marked where my Zipbolts will go, which I decided would be positioned at the center of the countertop depths plus one each at 4-1/2″ from the front and rear edges. The holes are placed ~1-1/2″ from the mating edge on either side. There’s some wiggle room allowed, and you can place the connector components a little closer or further apart if needed.
I had previously purchased a 35mm long-shank Forstner drill bit, and a Rockler Jig It drill guide that I equipped with a 3/8″ stop collar (purchased from an industrial supplier). I checked the drilling depth with digital calipers (the stop collar slipped twice and so I didn’t trust it).
Once my holes were set, I used a compact router with 1/2″ straight cutting bit to make room for the Zipbolt’s threaded bolt. I started with a 1/4″ straight cutting bit, but it didn’t leave much wiggle room for imperfectly aligned holes, and so I went with a 1/2″ slot.
I matched things up and tightened things down with a 5mm hex key. I later used a cordless screwdriver with a 5mm screwdriver bit, and then a ratchet with bit holder for final tightening.
I was worried I’d strip the geared drive, and so I didn’t tighten things down as much as possible, but the seam was pulled closed and tight. Once securely fastened together, fastened the now 3-piece L-shape countertop to the bench.
I didn’t use a store-bought template for creating a jack miter seam (here’s a discussion about what I was going for), and it might have been a mistake. I had to make due with a 1/4″ shank and too-short top-bearing trim router bit because that’s what they had at the home center, and I wonder if I would have had better results with a store-bought template. Unfortunately, I couldn’t find one (at least not as reasonable pricing), and my benchtop CNC router is too small to make one of proper length.
With difficulty in getting my seams just right – and there’s no guarantee that simple butt joints would have been any better than the the jack miter – I was worried about how my Zipbolt installation would go. There are templates for creating countertop connector hole patterns, although I don’t know if they have any for Zipbolt specifically.
I don’t want to say it was easy, because I would undoubtedly have had a little more trouble drilling straight holes free-hand without the basic but effective Rockler Forstner drill bit guide, but it was far easier than I anticipated, and with near-perfect results.
I wasn’t perfect with routing my slots either, but the one or two mistakes I made had no impact on the final results.
The 81mm Zipbolts are $2 each at Lee Valley, and with 3 used per mating edge connection, that’s 6 Zipbolts and $12 worth of hardware that went into my countertop.
I was so excited at things finally working out that I neglected to take proper photos. So, here’s Lee Valley’s image of the 100mm Zipbolt connector in use.
So far, my experience with these connectors have been extremely positive, and I’ll definitely use them for future countertop projects and even some other types of fastening needs.
Here’s a quick video that shows how they work: