As I mentioned on the ToolGuyd Instagram channel and also in our what did you buy during Black Friday/Cyber Monday sales? post, I finally bought a 3D printer.
Well, this is technically the second 3D printer I bought. My first purchase was a few years back, for a Printrbot Simple that I couldn’t get to work before I finally returned it.
I opted for a Prusa i3 MK3S+ kit.
I have a long learning curve ahead of me as I figure out how to 3D-print the parts and components I cannot easily or quickly fabricate via other means. One good thing about Prusa is that they update and revise their i3 printer regularly. The i3 is a hugely popular model, and so I won’t be alone if I encounter all but the rarest of problems or issues.
I took advantage of Prusa’s holiday deal, where they offered free shipping (from Europe), a free spool of PET filament (on top of the included spool of PLA), and a second removable build sheet.
Benjamen has been either teasing me or using reverse psychology, and so I unboxed the printer today to start assembling it.
If I recall correctly, it’s said to require 8 to 10 hours to built from the kit – at the least.
You can purchase a pre-assembled version, if you don’t want to spend time assembling the kit, but building the printer is a good learning experience. Yes, I wanted to save money, but I also considered that international shipping is going to be easier on a box of parts than a fully-assembled machine.
With my track record, it’d take me a month to build this, maybe two. Or maybe even a year.
So, wanting to prove Ben wrong, I got started today. (That’s a half-truth – I was set to spend some time cleaning my garage workshop and my office workspace, and I convinced myself that getting the 3D printer built would help serve that goal at least partially.)
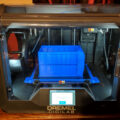
Above is where I am at now – I built the frame, X, Y, and Z axes. Now I’m up to the extruder axis, which is said to be the hardest and most important part, and so it seems to be a good place to stop.
To be frank, I’m not in love with the idea of using 3D-printed parts to assemble the machine, but there are reasons why this is done. I assume that 1) what better way to showcase what the machine can do?, 2) it allows for faster iterations and less expensive parts than injection molding, and 3) it allows for user-printed updates in the future as revisions are made.
I would say I might try to replicate the parts via manual machining or a small CNC router I’ve been meaning to spend more time with, but the parts’ shapes are too complex. That could also be why they’re 3D-printed – doing so allows for different possibilities than subtractive fabrication technologies, which is why I wanted to buy this machine in the first place.
Once everything is up and ready, and presumably working perfectly, I’ve got some shopping to do. I’m already thinking that it the printer needs an enclosure, but I also want to look around for a fume extractor. I might use my soldering fume extractor short-term, but that’s not a long-term solution.
I have a full schedule tomorrow, but I’ll try to get some more progress done this week.
Any questions?
There’s also a ton of resources at Prusa’s website. So far, I’m already spoiled by their excellent documentation.