Image may be NSFW.
Clik here to view.
This past June, I had the opportunity to visit a Dewalt facility in Charlotte, North Carolina, where they have been building cordless power tools using domestic and global components.
While our time at the factory was short, it was a very enjoyable experience. It was great to get an inside look at how power tools are built.
A lot of our time was spent being introduced to new Dewalt power tools, hand tools, and accessories, but we also took a tour of the space and were also given the chance to build our own drills.
That’s right, I built my own Dewalt brushless drill! Well, part of it. Some parts were built at other factories, and Dewalt techs did the more skillful work.
I know it’s not the same, but hopefully these photos will give you a sense of what goes on at the Dewalt NC factory.
Table of Contents
Part 1: Intro
Part 2: Factory Tour Highlight: Motors!
Part 3: Let’s Build a Brushless Drill!
Part 4: More at the Factory
Part 5: New Tool Previews
Intro to the Factory
Image may be NSFW.
Clik here to view.
Well, here it is. I don’t recall the details and cannot find my notes (whoops), but remember something being said about how this facility started out as a distribution center, and how space was made for the assembly and manufacturing stations.
Image may be NSFW.
Clik here to view.
It’s not accurate to say that products are being made here – they’re being built here, using domestic and global materials.
With something like an impact driver motor, the armatures might be made one place, the shafts at another, and they’re assembled before arriving at another location for winding. I believe the shafts are made in the USA – Jackson, TN if I remember correctly.
Image may be NSFW.
Clik here to view.
As of June 2015, Dewalt had 7 USA manufacturing facilities, pumping out 14 million products on 2014. I’m guessing that this number also includes certain power tool accessory SKUs.
Image may be NSFW.
Clik here to view.
Here’s a view of the factory floor. There are assembly lines along both sides, and beyond them are distribution and shipping operations. Motor production occupies the central floor.
You can also see where demonstration stations were set up for the media event. All that space is probably occupied with additional motor production equipment by now.
Factory Tour Highlight: Motor Building
Even though the drill-building exercise was the best part of the factory tour, I very much enjoyed getting a glimpse at impact drivers being made. It’s just not something you see every day.
Image may be NSFW.
Clik here to view.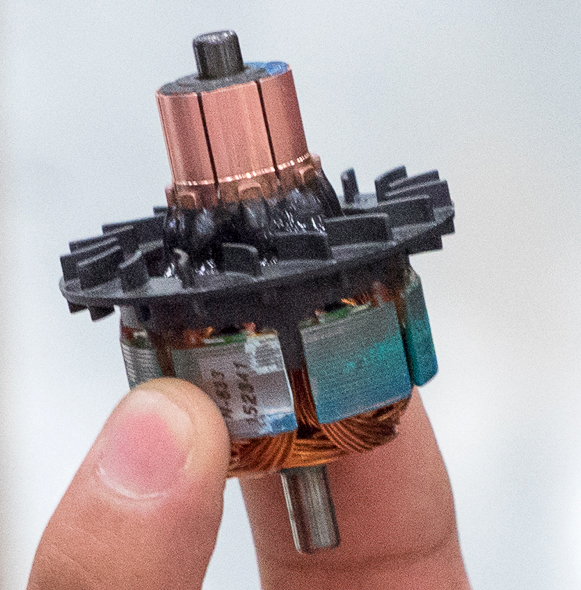
This is a finished brushed motor that will be installed in a Dewalt DCF885 impact driver.
Image may be NSFW.
Clik here to view.
The motors are partially built before being wound with magnet wire at the Dewalt factory. There’s the shaft, commutator, and laminated armature core.
Then, the motor is wound. Here’s a video I took of the process:
A few more things go on before the motors are ready. Unfortunately, I wasn’t able to make my way back to this part of the factory floor for additional details or photos.
Image may be NSFW.
Clik here to view.
Here they are, wound and ready for…
Image may be NSFW.
Clik here to view.
Testing? I don’t remember what’s done at this station, but it seems to involve a messy blue liquid of some kind. Maybe a thin protective coating is applied to the wound motors?
There’s a coil press tool kit, so this is a coil press station. What’s the coil press doing?
The fans aren’t attached yet, but I don’t think that happens until somewhere further down the line.
Image may be NSFW.
Clik here to view.
Next up is the balancing station.
Image may be NSFW.
Clik here to view.
Each motor is spun up to high speed, and if they’re a little unbalanced, a little weight compound is added to help even things out.
Let’s Build a Brushless Drill!
Image may be NSFW.
Clik here to view.
Our hands-on activity involved building a Dewalt DCD995 brushless premium 3-speed hammer drill ($279 via Amazon for the kit).
This is Dewalt’s highest performing 20V Max cordless drill.
We didn’t start at the beginning, but I tried to cover as much of the assembly process as possible.
It Starts With the Motor and Controller
Image may be NSFW.
Clik here to view.
The parts that go into the DCD995 aren’t all built or assembled at the Charlotte, NC facility. All of the sub-assemblies come in from other places.
To start off, there’s the motor and switch assembly.
Image may be NSFW.
Clik here to view.
Here’s the DCD995’s brushless motor. If you didn’t know what it was, you might be mistaken into thinking it’s an RC or hobby motor of some kind. It might be small, but it packs a strong punch.
Image may be NSFW.
Clik here to view.
Next up is the pre-assembled and potted switch assembly. I don’t remember of the plastic trigger was pre-installed or attached at the Charlotte factory, and none of my photos can answer this question either. Not that it’s important.
Notice how the electronics of the switch are all potted. This provides shock resistance and should help with durability and protection against vibrations. It might also serve to protect the electronics from moisture or debris, but I don’t think contaminants easily find their way into this part of a drill.
Image may be NSFW.
Clik here to view.
The brushless motor and switch assembly are connected at the factory.
Image may be NSFW.
Clik here to view.
A handy fixturing jig holds the two components for soldering.
Image may be NSFW.
Clik here to view.
And a technician solders the components together by hand. The three large wires, likely carrying high power from the battery pack, are soldered, while the motor control wiring is attached with quick plastic connectors.
Image may be NSFW.
Clik here to view.
One component gets a bit of heatshrink tightened around it, and a Porter Cable heat gun is used to do it.
This is a… thermistor for temperature sensing? There is a thermistor, somewhere, which shuts off the tool in case of overheating. But I don’t think that’s what this is.
In later photos, wiring inspection diagrams describe it as a hall effect sensor, which I guess makes sense. I’ve never seen a 2-pin hall effect sensor embedded within a plastic Molex or JST type connector before.
There’s also that red-coated needle-pointed component protruding from the rear of the brushless motor. The heatshrinked connector and that red rear component are placed near each other. I wonder if this is for maintaining speed control under load.
Brushless motors have hall effect sensors for position sensing and the such, but I believe those are usually inside the motor.
Any ideas? Too bad I can’t go back in time and bug a production manager for some insight.
Then Comes the Assembly Process
Image may be NSFW.
Clik here to view.
Once the guts are ready, the drill’s injection molded housing is prepped. This too is manufactured elsewhere. So to prep, the two halves are basically separated and placed on a holding jig.
Image may be NSFW.
Clik here to view.
A couple of metal pins go into the housing, for… easier alignment? The gearbox, electronic clutch, and chuck, all in a one-piece assembly built elsewhere, is passed along with the housing.
Where’s that second half of the drill housing? It’s conveniently stored in the space beneath the molded fixture, until it’s needed. Can’t lose it there!
Image may be NSFW.
Clik here to view.
You can’t just throw the components together, they have to be delicately connected and seated.
There’s the LED PCB that needs to be seated at the base of the drill, and the clutch is connected to the control switch electronics by means of a 3-pin connector.
Image may be NSFW.
Clik here to view.
Potential pinch points are highlighted in this wiring inspection guide.
Image may be NSFW.
Clik here to view.
Here it is, everything nice and neat and ready to be enclosed by the housing. The direction selection switch, or rather the buttons, have been added. Everything is connected and ready to go.
Image may be NSFW.
Clik here to view.
This is the part where hands-on begins, and we “built” our own drills. C’mon, I can solder! Maybe next time they’ll let me start at Station 1 if I ask nicely [nag them] enough.
The two parts of the housing are fastened together in two stages.
First, 4 screws are placed in the side of the drill, presumably just to hold things together.
Then, 4 screws are placed in the front of the drill, through the gearbox assembly, connecting it to the rear housing.
Finally, 4 more screws are placed in the side.
This is all done with drop-down pneumatic screwdrivers that have pre-set torque. They’re quiet, and tighten the fasteners quickly and to the right torque every time. For the transmission, a longer bit is used to access the fasteners.
The fasteners are all tightened in a specific numbered order to ensure uniform tightness and consistency.
It was actually rather fun to use that screwdriver.
We’re Not Done Yet – Every Tool is Tested for QC
Image may be NSFW.
Clik here to view.
Next up, programming. I suppose this makes sense, but I had always assumed that the controller’s firmware was programmed when the sub-assembly is built. But this makes sense. Maybe different tools have similar sub-assembly manufacturing steps. Programming a finished tool might be most efficient.
Because there are moving parts, safety interlocks are used for finger detection. If you’re finger’s on a safety switch, they can’t be in the way of danger.
I don’t remember if one hand needs to be on the interlock and another on the green button, or both hands at the interlocks.
Image may be NSFW.
Clik here to view.
There it goes, the drill is being programmed… through the battery connection? I wouldn’t have guessed you could do that.
Image may be NSFW.
Clik here to view.
Next up, testing! Once the firmware is programmed to the tool, basic functionality and operating parameters must be checked.
Image may be NSFW.
Clik here to view.
In addition to finger-detecting interlocks, there’s a drop-down (or rather pneumatically pushed down) plastic shield.
This setup tests the drill’s speed, current draw, LED operation, and thermistor, among a few other things.
Image may be NSFW.
Clik here to view.
There was also a separate electronic clutch testing station. I wish I could find my notes to tell me whether this came before or after basic testing.
This station checks to ensure the electronic clutch is working properly. There was also a separate block of plastic for pressing the chuck against, to make sure the hammer mode worked properly.
There are a LOT of quality control checks, to ensure that every tool operates as it should.
Finally – Labeling and Kitting
Labeling wasn’t very exciting, so I didn’t take any photos. The same with kitting.
Surprisingly, labeling is a big deal. After labels are applied, they’re checked by computer for proper placement. It’s at this stage that a date code is added to a drill. Each drill is also given markings on the inside of the battery connector housing, to show that they’ve been tested and passed QC.
Then the drill is kitted in a carrying case with batteries, a charger, a side handle, and manual, before being boxed. The box receives a matching serial number.
And… BAM, There’s Your New Drill
Image may be NSFW.
Clik here to view.
And yes, I got to keep the one I built. =)
More at the Dewalt Factory
Still with me? Great! Don’t worry, I’ll fly through the rest of what I want to show you.
Image may be NSFW.
Clik here to view.
This is the labeling station for 18V reciprocating saws, but the steps are similar for all of the tools being built at this factory.
Once labels are applied, they’re checked, and the tool is officially ready to be sent off to a customer.
Image may be NSFW.
Clik here to view.
There’s lots of production being done in the center of the factory floor – mainly motors.
Image may be NSFW.
Clik here to view.
I believe that some of this equipment was brought up from a Dewalt plant in Mexico, not that it matters.
By now Dewalt has probably doubled their motor production capabilities at this location, or at least that’s what I remember hearing.
Image may be NSFW.
Clik here to view.
Remember the Dewalt DCF885 20V Max impact driver motors I showed you earlier in the post? Here’s such an impact being built.
Image may be NSFW.
Clik here to view.
How do you test impact drivers? In enclosed cabinets, to help muffle out the sound.
Image may be NSFW.
Clik here to view.
There was a second bank of cabinets that I was able to peak inside of.
Image may be NSFW.
Clik here to view.
Hmm, the brushed motor impacts go through similar programming, also through the battery connection. I wouldn’t have guessed.
Image may be NSFW.
Clik here to view.
More testing!
Image may be NSFW.
Clik here to view.
Even more testing!
Image may be NSFW.
Clik here to view.
I don’t remember if this is a programming or testing station, but I wanted to point out the white plastic block that’s used for testing of a hammer drill’s hammer mode.
Image may be NSFW.
Clik here to view.
What? Dewalt is still making 18V drills?
Image may be NSFW.
Clik here to view.
They’re built differently than the 20V Max brushless drills.
Image may be NSFW.
Clik here to view.
And here’s a brushed motor 20V Max drill, in the middle of being built.
Image may be NSFW.
Clik here to view.
What I found interesting is that the brushed motor 3-speed drills are fastened together differently, with a screw guide.
Maybe the brushless drill production only recently started at this facility, and fixtures like this hadn’t yet been produced yet.
Image may be NSFW.
Clik here to view.
The factory activities were not just part of a show put on for the media. These are real drills headed for sale. I don’t remember what would become of these drills. Maybe they were meant to be kitted with the impact drivers in combo kits.
Image may be NSFW.
Clik here to view.
And yes, there were 18V tools being produced as well – here’s a batch of newly built reciprocating saws.
Maybe Dewalt will invite us all back to the Charlotte factory some day, so we can see how things evolve. Ooh, or maybe one of their other factories?
As you can tell, I had a LOT of fun touring the Dewalt factory and assisting in building my own drill.
About Those New Tools We Saw…
Dewalt showed off a lot of their new tools that were coming out in the later half of 2015, and a couple are still expected to hit the market in 2016.
You can read about these new tools here: